Hello, fabulous foodies! It's Colette here, wishing you a very happy 2013!
As you've probably noticed, our little blog fell by the wayside as the fall and winter months got busier and busier and busier...we're sorry, and we've missed you! But don't worry - we've been cooking (and eating!) plenty, and are working on posts to share with you in the coming weeks.
In the spirit of the New Year, we'd also like to hear from YOU! Do you have any food/drink-related resolutions? Anything you'd like to see from us in 2013? Share in the comments below!
Here's to another great year full of great food, great drink, and great memories!

Showing posts with label Taste and Tattle Tuesday. Show all posts
Showing posts with label Taste and Tattle Tuesday. Show all posts
Tuesday, January 8, 2013

Tuesday, September 11, 2012
Taste and Tattle Tuesday: Pea Risotto with Scallops
Hi Everyone! Today Lauren is presenting her spin on Tyler Florence's Sweet Pea and Scallop Risotto.
For the full original recipe, click here!
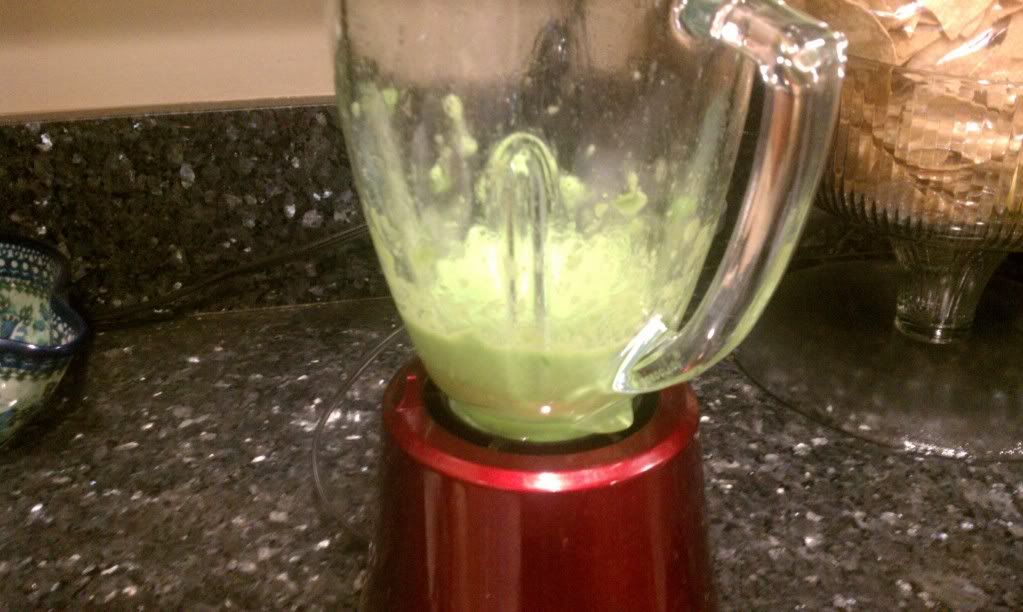
1. The first step is to make the puree. Set it aside.
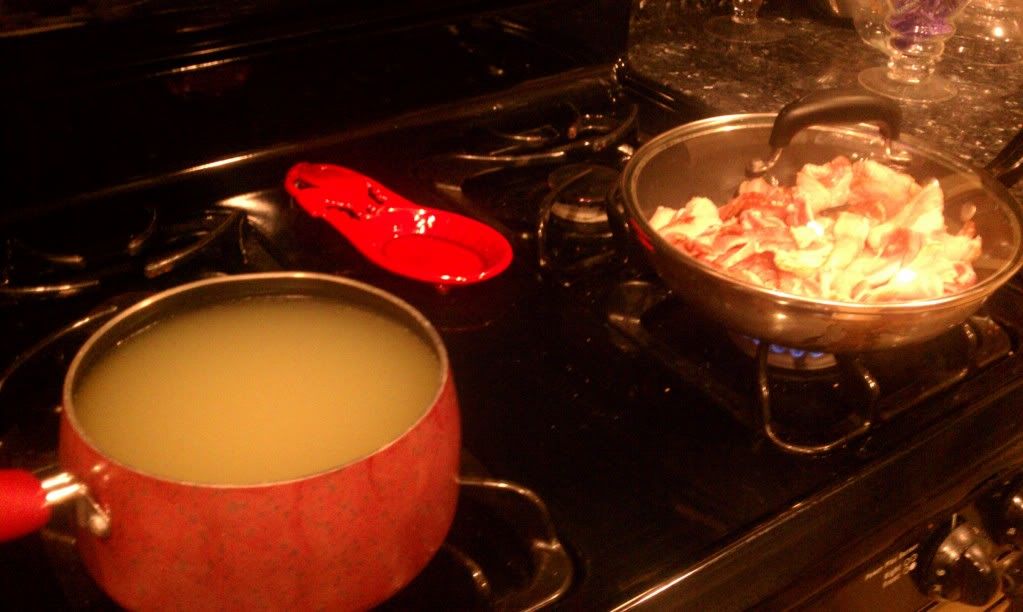
2. Next, I get the chicken stock or broth warming up. I also start cooking some bacon. This recipe doesn't call for bacon, but I think it adds a nice salty element. Note: if you want to make this vegetarian, use vegetable broth/stock and forget what I said about bacon.
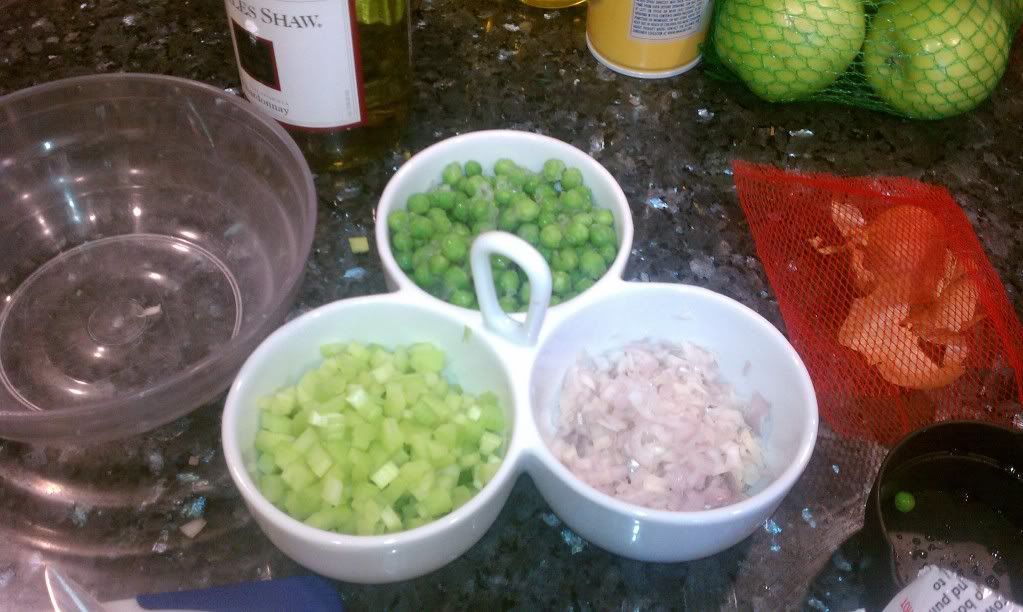
3. Next, you'll need to prep your celery, shallots, and peas (if frozen, let thaw). I choose to add a bit more celery and shallots than the recipe calls for. I love shallots, and I like a little bit of crunch.
4. Saute the celery and shallots in a bit of olive oil. Then, add in the rice and make sure the rice gets coated in the olive oil. Tip: I do this with my Spanish rice, too! It just makes the rice better :)

5. Once step four is done, start adding a cup of stock at a time. Once the first cup is absorbed, add another. Repeat. You may or may not use all of the stock the recipe calls for.
6. Season with salt and pepper. It's important you add a bit, taste, and then, if necessary, adjust. At first, I'm pretty light with both because you can always add more.
7. Stir in the Parmesan and butter. Tip: use any Italian cheese you like. I prefer to use Pecorino Romano. I also add more cheese than the recipe calls for.
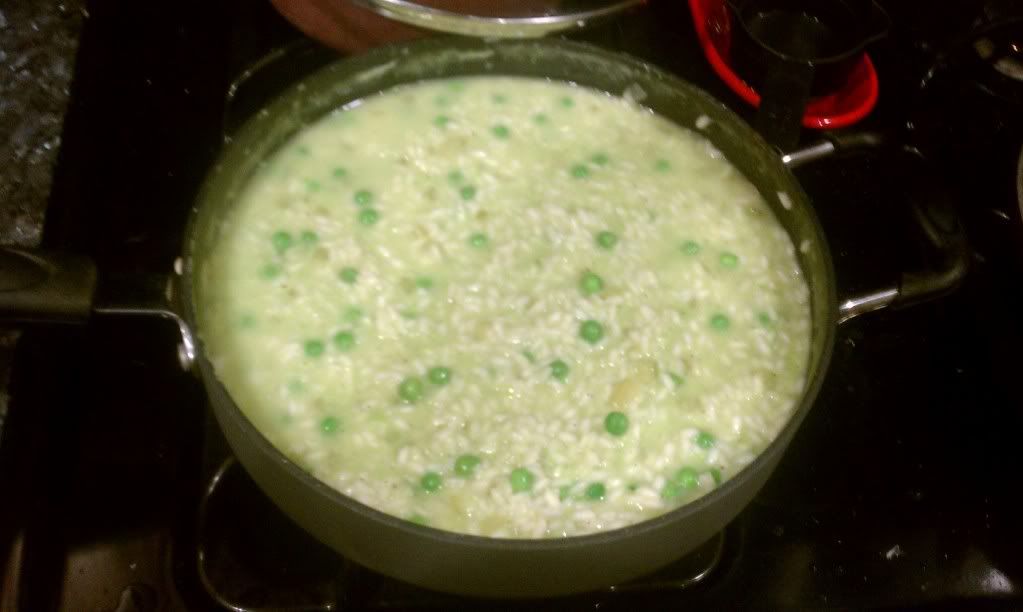
8. Lastly, fold in puree and whole peas. Take off heat, cover, and set aside.
If you want to add scallops, you have a few more steps. If not, you're done!
9. Make sure you pat the scallops with paper towels, and then season on both sides with salt and pepper.
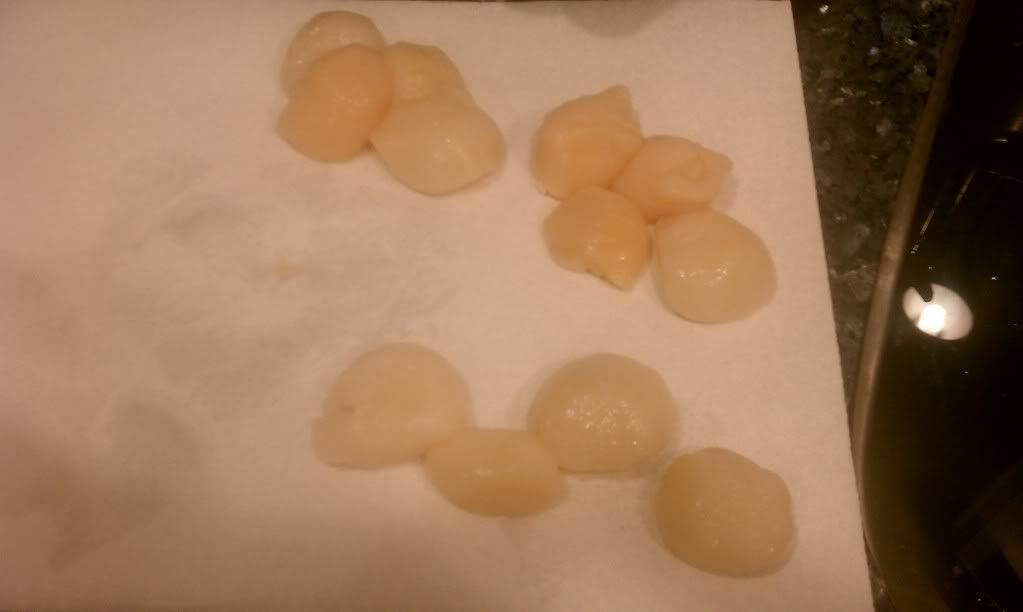
10. Warm a pan that contains a bit of olive oil and butter. Remember, never put anything in a cold pan. Do not crowd the scallops and do not add too much oil. If you do the first thing, they won't cook well. If you do the second thing, they will boil/poach versus sear.
11. Do not touch your scallops until you're ready to flip them. I wait for them to look a little less translucent halfway through, and then I flip them. I suggest using a fish spatula, if you have one.
12. I let my scallops rest on a paper towel.
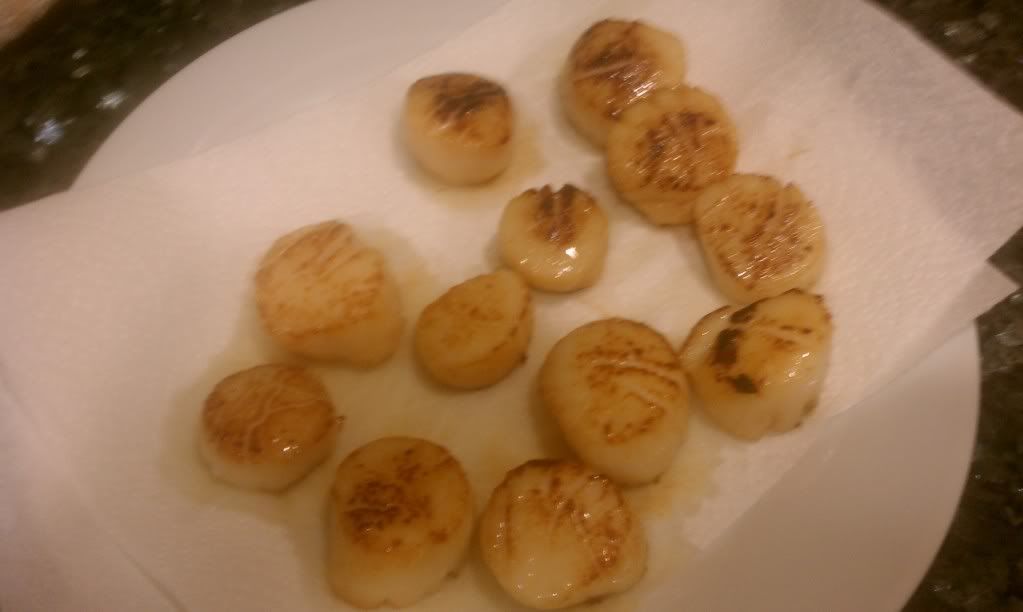
Then you're ready to plate your whole meal, and voila!

It's a fairly inexpensive meal that will blow people away. It's also easy to do, so don't be scared.
If you try this, please let us know. We'd love to hear about your experience with this recipe. Enjoy!
For the full original recipe, click here!
1. The first step is to make the puree. Set it aside.
2. Next, I get the chicken stock or broth warming up. I also start cooking some bacon. This recipe doesn't call for bacon, but I think it adds a nice salty element. Note: if you want to make this vegetarian, use vegetable broth/stock and forget what I said about bacon.
3. Next, you'll need to prep your celery, shallots, and peas (if frozen, let thaw). I choose to add a bit more celery and shallots than the recipe calls for. I love shallots, and I like a little bit of crunch.
4. Saute the celery and shallots in a bit of olive oil. Then, add in the rice and make sure the rice gets coated in the olive oil. Tip: I do this with my Spanish rice, too! It just makes the rice better :)
5. Once step four is done, start adding a cup of stock at a time. Once the first cup is absorbed, add another. Repeat. You may or may not use all of the stock the recipe calls for.
6. Season with salt and pepper. It's important you add a bit, taste, and then, if necessary, adjust. At first, I'm pretty light with both because you can always add more.
7. Stir in the Parmesan and butter. Tip: use any Italian cheese you like. I prefer to use Pecorino Romano. I also add more cheese than the recipe calls for.
8. Lastly, fold in puree and whole peas. Take off heat, cover, and set aside.
If you want to add scallops, you have a few more steps. If not, you're done!
9. Make sure you pat the scallops with paper towels, and then season on both sides with salt and pepper.
10. Warm a pan that contains a bit of olive oil and butter. Remember, never put anything in a cold pan. Do not crowd the scallops and do not add too much oil. If you do the first thing, they won't cook well. If you do the second thing, they will boil/poach versus sear.
11. Do not touch your scallops until you're ready to flip them. I wait for them to look a little less translucent halfway through, and then I flip them. I suggest using a fish spatula, if you have one.
12. I let my scallops rest on a paper towel.
Then you're ready to plate your whole meal, and voila!
It's a fairly inexpensive meal that will blow people away. It's also easy to do, so don't be scared.
If you try this, please let us know. We'd love to hear about your experience with this recipe. Enjoy!
Tuesday, September 4, 2012
Taste and Tattle Tuesday: Food Truck Love
Hi all! Colette here!
When Lauren and I were first brainstorming for this blog, we knew we wanted it to be a lot about our kitchen adventures, but we also wanted it to be about our real-world foodie adventures as well. I know Lauren has some amazing stories to tell us about NYC in the coming weeks, but for today, I'd like to focus our attention a wee bit closer to home and talk about my favorite SoCal food truck!
I've been trying lots of food trucks lately. It can be hard, being a pescatarian (and married to a vegetarian), since many food trucks have meat-heavy menus. But then I discovered the amazing, the incredible, the incomparable Eat At Recess.
Eat At Recess makes great food using great ingredients! Don't worry meat lovers, they have free range chicken and grass-fed beef. But, as one of their three simple rules states, Our animal products are all natural and humanely raised. Awesome, right? They ALSO have vegetarian faux-turkey, which I get quite a bit.
In addition, they have crazy fresh veggies used on their sandwiches and salads, which brings us to playground rule #2: We use local and organic produce as much as possible. I never thought the freshest, most diverse salad options I would experience locally would come from a food truck, but Eat At Recess delivers!
And, another awesome bonus about this food truck? Everything is served in 100% compostable packaging. Again, how cool is that?!?!
The truck is all school-themed as well, which makes this former professor's heart sing. Items on the menu include "The Trackstar" and "The BFF BLT." My husband's favorite is the "Green Light" (which has a spicy "Red Light" counterpart) and the "AP tots." Oooooo, the tots. I'll get there. I've tried a number of things on the menu, and my two favorites are the "Red Rover" or the "Simon Says Southwest" (both with veggie-meat instead of chicken) and the "Remedial tots."
Mmmmm. The tots. Okay, this place is KNOWN for their amazing tater tots. And let me just get this out there: I don't really like tater tots. But these? I devour them every week. The AP tots that my husband get have feta cheese and truffle oil on them (soooooo good), where the ones I get have a special spicy recess sauce, cheddar cheese, and bacon salt (which is actually vegetarian). I also add chopped jalapenos to mine.
So, if you're out and about in San Diego and see this bright yellow school bus colored food truck, it's worth being late to wherever you were going to stop and try their amazing food.
And if you don't believe my words, maybe you'll believe this:
Have you tried an amazing local food truck? What do you think about the food truck craze? Tell us in the comments!
When Lauren and I were first brainstorming for this blog, we knew we wanted it to be a lot about our kitchen adventures, but we also wanted it to be about our real-world foodie adventures as well. I know Lauren has some amazing stories to tell us about NYC in the coming weeks, but for today, I'd like to focus our attention a wee bit closer to home and talk about my favorite SoCal food truck!
I've been trying lots of food trucks lately. It can be hard, being a pescatarian (and married to a vegetarian), since many food trucks have meat-heavy menus. But then I discovered the amazing, the incredible, the incomparable Eat At Recess.
Eat At Recess makes great food using great ingredients! Don't worry meat lovers, they have free range chicken and grass-fed beef. But, as one of their three simple rules states, Our animal products are all natural and humanely raised. Awesome, right? They ALSO have vegetarian faux-turkey, which I get quite a bit.
In addition, they have crazy fresh veggies used on their sandwiches and salads, which brings us to playground rule #2: We use local and organic produce as much as possible. I never thought the freshest, most diverse salad options I would experience locally would come from a food truck, but Eat At Recess delivers!
And, another awesome bonus about this food truck? Everything is served in 100% compostable packaging. Again, how cool is that?!?!
The truck is all school-themed as well, which makes this former professor's heart sing. Items on the menu include "The Trackstar" and "The BFF BLT." My husband's favorite is the "Green Light" (which has a spicy "Red Light" counterpart) and the "AP tots." Oooooo, the tots. I'll get there. I've tried a number of things on the menu, and my two favorites are the "Red Rover" or the "Simon Says Southwest" (both with veggie-meat instead of chicken) and the "Remedial tots."
Mmmmm. The tots. Okay, this place is KNOWN for their amazing tater tots. And let me just get this out there: I don't really like tater tots. But these? I devour them every week. The AP tots that my husband get have feta cheese and truffle oil on them (soooooo good), where the ones I get have a special spicy recess sauce, cheddar cheese, and bacon salt (which is actually vegetarian). I also add chopped jalapenos to mine.
So, if you're out and about in San Diego and see this bright yellow school bus colored food truck, it's worth being late to wherever you were going to stop and try their amazing food.
And if you don't believe my words, maybe you'll believe this:
 |
| The "Exchange Student" and Remedial Tots + Jalapenos. |
Have you tried an amazing local food truck? What do you think about the food truck craze? Tell us in the comments!
Tuesday, August 28, 2012
Taste and Tattle Tuesdays: Restaurant-Style Salsa
Hi all! Colette here!
It's hard to believe September is just around the corner. With Labor Day coming up, here's a great side dish to bring to your end-of-summer pool parties and BBQs. I actually made and served this salsa at a party I hosted last weekend, and many people left asking me for the recipe. Well, here it is!
Colette's Restaurant-Style Salsa
What makes a salsa "restaurant-style" in my mind? For one thing, freshness. Ripe tomatoes and hand-squeezed lime juice are a party in your mouth, unlike canned/preserved salsas from a jar. (Don't get me wrong -- I'll eat pretty much any kind of salsa all the time. But fresh is best). Another thing is that it tends to be less chunky -- it's pureed, not chopped. That's how I make mine.
Ingredients
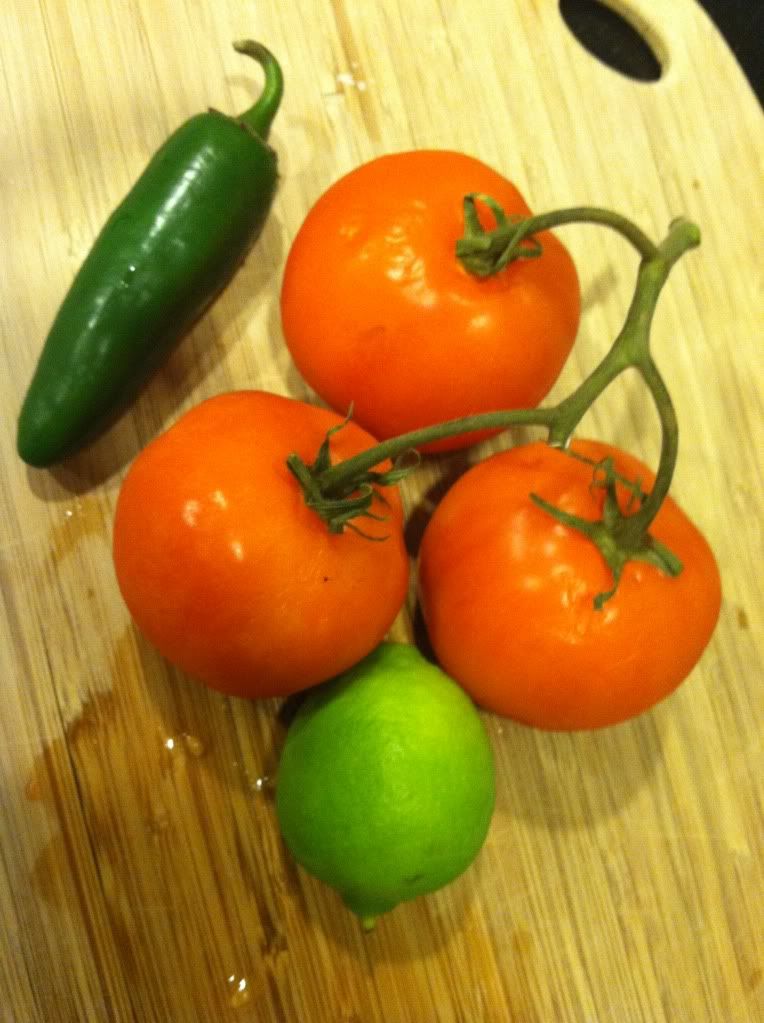
Four (4) large, ripe tomatoes
Three (3) small limes
One (1) whole jalapeno
One (1) jalapeno, seeds removed*
Two (2) tablespoons chopped white onion
1/4 cup chopped red onion
Two (2) tablespoons cilantro leaves (pre-chopped is fine)
Salt & Pepper, to taste
Tools
Knife
Cutting Board
Food Processor (small)
Directions
(1) Gather and prep all of your ingredients. You can choose to chop a whole onion yourself or be lazy like me and buy the pre-chopped kind from Henry's. *wink* Make sure as you chop one jalapeno, the seeds stay inside, and on the other, you remove all the seeds.
Why de-seed a jalapeno? Most of the spice in peppers comes from the seeds inside. While the flesh of jalapenos is also spicy, removing the seeds will take the heat down a notch. Now, I like my salsa flaming hot, so I'd normally use 2-3 whole jalapenos. But like I said, this was for a party, and I wanted to please a lot of palates.
(2) Add some of the ingredients to the food processor. I don't mean just pick and choose -- I mean add a little bit of each ingredient that you have. This will allow everything to blend better. Start with about 1/3 of each ingredient that you have chopped/prepped (tomatoes, jalapeno, onions, cilantro). Squeeze the juice from one lime over the ingredients:

(3) Pulse/chop for one minute. Repeat until all the ingredients are blended together:
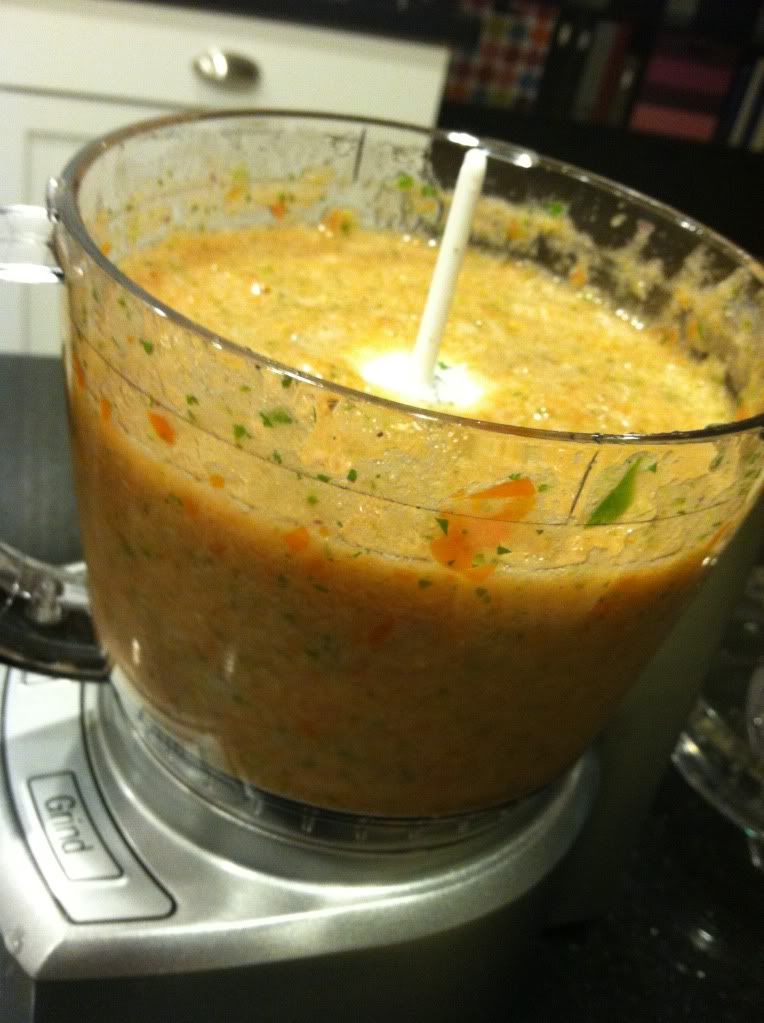
That's it! Smooth and spicy, it's perfect for any party.
Enjoy!
It's hard to believe September is just around the corner. With Labor Day coming up, here's a great side dish to bring to your end-of-summer pool parties and BBQs. I actually made and served this salsa at a party I hosted last weekend, and many people left asking me for the recipe. Well, here it is!
Colette's Restaurant-Style Salsa
What makes a salsa "restaurant-style" in my mind? For one thing, freshness. Ripe tomatoes and hand-squeezed lime juice are a party in your mouth, unlike canned/preserved salsas from a jar. (Don't get me wrong -- I'll eat pretty much any kind of salsa all the time. But fresh is best). Another thing is that it tends to be less chunky -- it's pureed, not chopped. That's how I make mine.
Ingredients
 |
| This is only some of what I used, thought what is pictured above is enough for an awesome salsa! |
Four (4) large, ripe tomatoes
Three (3) small limes
One (1) whole jalapeno
One (1) jalapeno, seeds removed*
Two (2) tablespoons chopped white onion
1/4 cup chopped red onion
Two (2) tablespoons cilantro leaves (pre-chopped is fine)
Salt & Pepper, to taste
Tools
Knife
Cutting Board
Food Processor (small)
Directions
(1) Gather and prep all of your ingredients. You can choose to chop a whole onion yourself or be lazy like me and buy the pre-chopped kind from Henry's. *wink* Make sure as you chop one jalapeno, the seeds stay inside, and on the other, you remove all the seeds.
Why de-seed a jalapeno? Most of the spice in peppers comes from the seeds inside. While the flesh of jalapenos is also spicy, removing the seeds will take the heat down a notch. Now, I like my salsa flaming hot, so I'd normally use 2-3 whole jalapenos. But like I said, this was for a party, and I wanted to please a lot of palates.
(2) Add some of the ingredients to the food processor. I don't mean just pick and choose -- I mean add a little bit of each ingredient that you have. This will allow everything to blend better. Start with about 1/3 of each ingredient that you have chopped/prepped (tomatoes, jalapeno, onions, cilantro). Squeeze the juice from one lime over the ingredients:
(3) Pulse/chop for one minute. Repeat until all the ingredients are blended together:
That's it! Smooth and spicy, it's perfect for any party.
Enjoy!
Tuesday, August 7, 2012
Taste and Tattle Tuesdays: Cold Entree
Good Morning, Foodies! Lauren here!
This week, we thought we'd feature a cold entree. I, however, don't do many cold meals (ahem! I blame the husband), so finding something that sounded yummy that is served cold posed a little challenge for me. I stumbled across a noodle dish, and since Asian food usually goes over well in our house, I gave it a shot.
Here's a link to the original recipe.
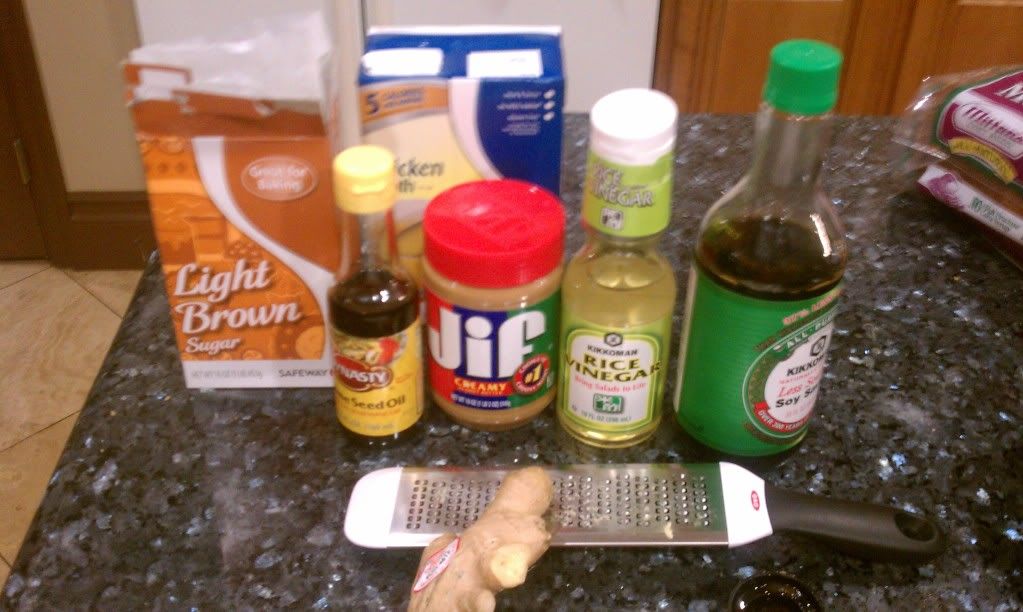
I did amend the recipe a bit. Whenever I follow recipes like this, I always find I don't have enough sauce, so I doubled the amount of everything, except the peanut butter.
Additionally, I added Sriracha (It's heaven if you like things spicy) and garlic. I knew I'd add sesame seeds and chow mein noodles at the end for garnish and flavor.
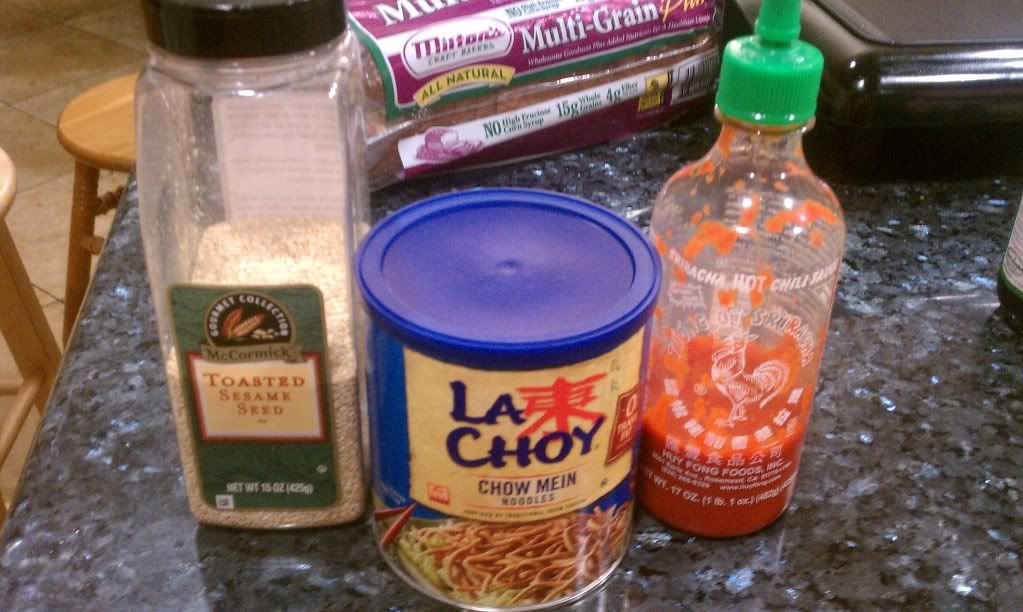
Tip: Never do anything just for garnish. Everything on the plate should be purposed to eat and add flavor. End of rant.
Mix the ingredients together and bring to a simmer.
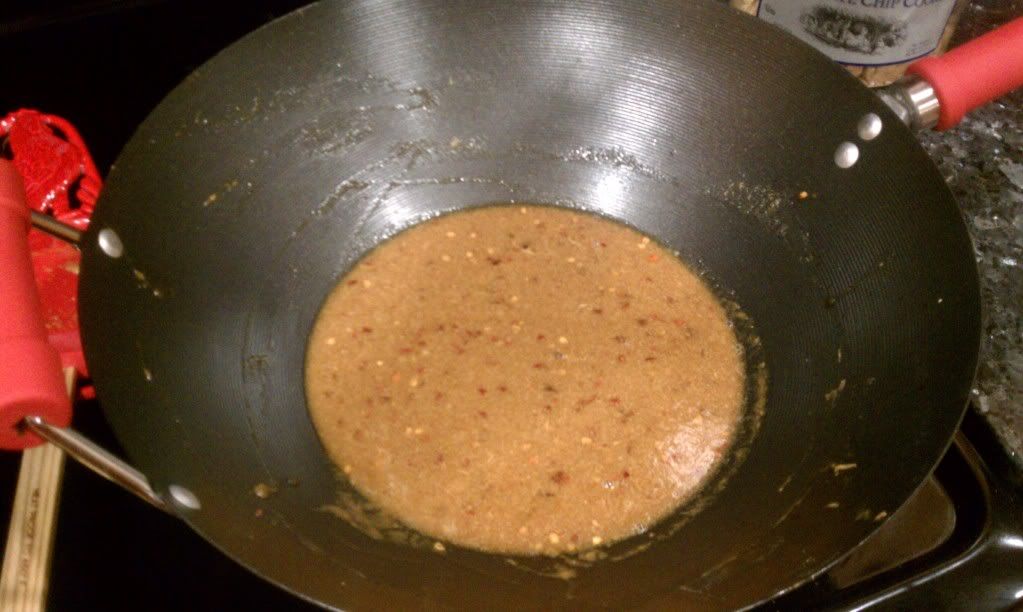
Another tip: taste and adjust. I found it was still a bit too much like liquid peanut butter, so I added more of my favorite ingredients. People often tell me they can't cook or stray from a recipe, but that's just not true. You know what flavors you like, right? Then, start there. That being said, I added more garlic and siracha.
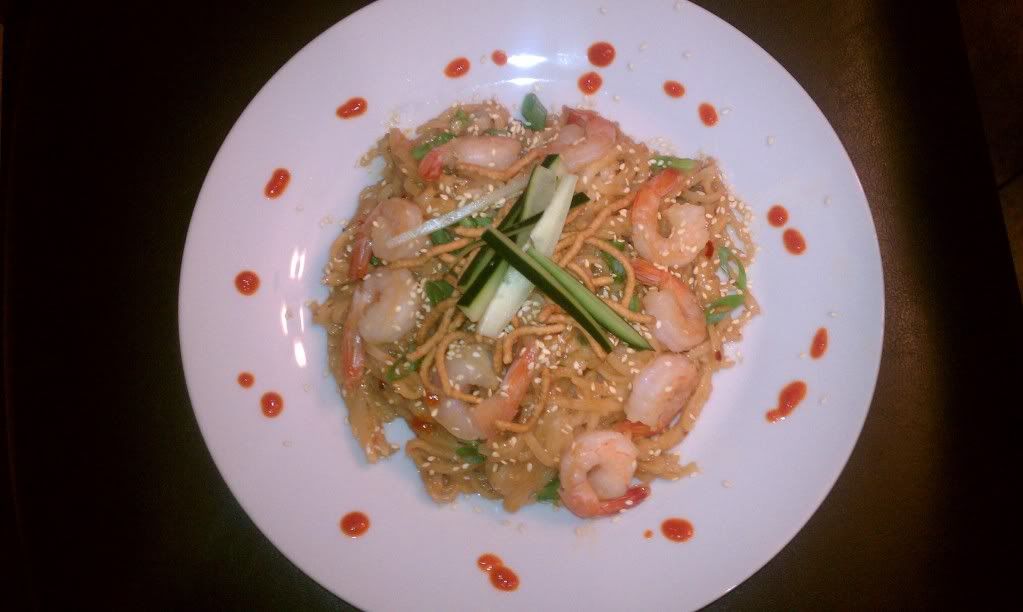
The recipe calls for pasta noodles, but I chose Pad Thai noodles (they were on sale and I love them).
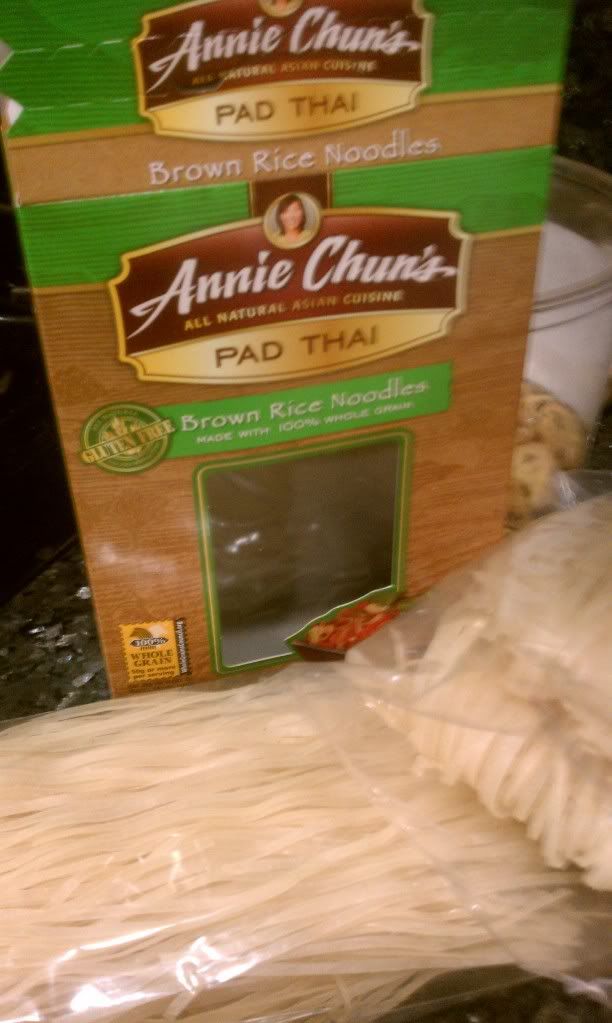
Boil your noodles (always salt your water, but never put oil in the water or this Italian will judge you from afar). Normally, you don't rinse pasta, but it's okay to rinse Pad Thai noodles. Then, toss the noodles with the sauce; dish on a plate; and garnish with scallions, cucumbers (I julienned mine) and chow mein noodles.
Final thoughts:
1. If you want to make this recipe officially vegetarian, use vegetable stock/broth instead of chicken.
2. I added shrimp for protein, but you could do chicken or beef, too.
3. You can serve this cold, at room temp, or hot. Because you can serve it at any temp, it makes a nice party dish or something to take on a picnic.
Enjoy!
Tuesday, July 24, 2012
Taste and Tattle Tuesday: Summer Salad
Hi Everyone! It's Colette!
We hope you have been enjoying our "Taste and Tattle Tuesdays" thus far. We're looking forward to bringing you more fun stuff on this blog soon, so thanks for sticking around and reading. Make sure you check out our Facebook page as well!
Well, it's time for another taste and tattle post! You know how this works -- we share a theme/recipe/idea, and then you link up with your own creations below! If you don't have a blog to link, just leave your ideas in the comments section.
Today's theme is Summer Salads!
To me, fresh salads are the BEST part of summer. They're light, they're delicious...there's just something about salad that says summer to me. This is especially true when I've had time to swing by a local farmer's market to pick up great ingredients. That's what I did this week!
Here are my tips for what make a great salad:
A good base. Remember when salad used to be that brownish iceberg stuff that they slapped on your lunch tray in the school cafeteria? That's not food. Play with what you use as the base for your salads by trying lots of different greens. When you find some you like, start mixing them to create new combinations.
An amazing dressing. But DON'T slather it on. Let the flavors you've assembled do their job; the dressing should just be a nice accent.
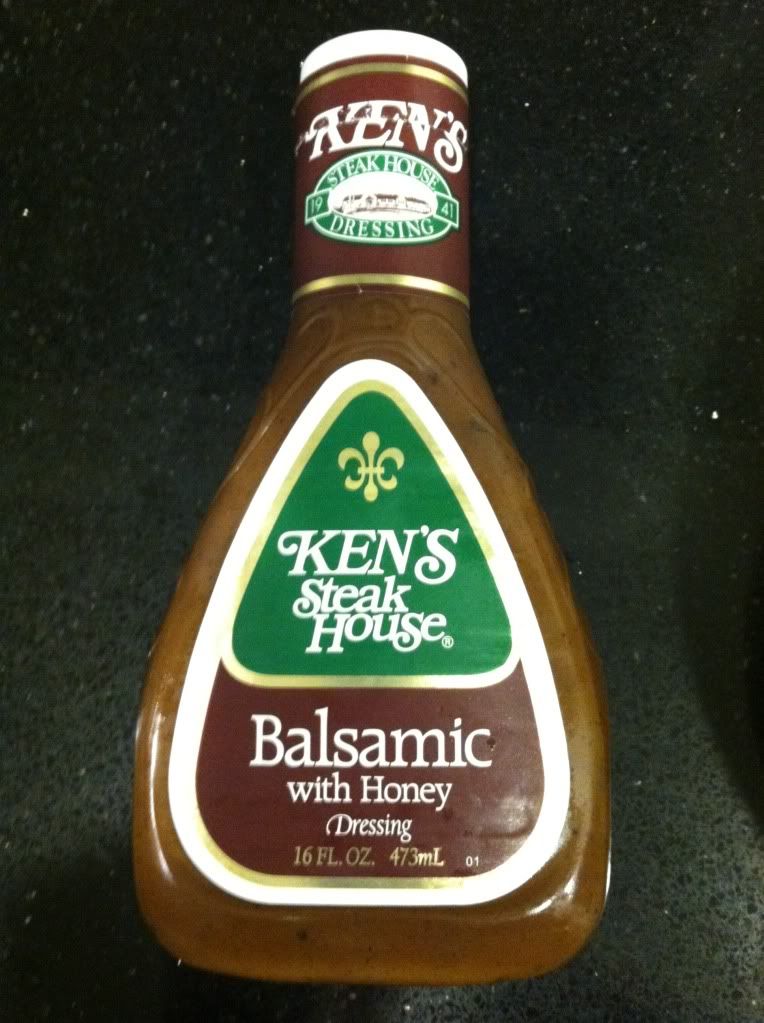 |
| One of my personal favorites, and the one I used for the salad recipe on here today. It's a perfect mix of sweetness and spice, and the honey makes it creamy without extra fat that you get in an actual cream-based dressing, like Ranch or Caesar. |
Add texture. For the recipe I'm sharing today, I didn't do this as well as I should have. Part of what makes a salad a great dish or meal is the texture. Add nuts, seeds, fruits, meats, cheeses -- lots of different options when you're assembling your veggies. Also, add veggies of different sizes and textures as well.
Cheese. Salads need cheese. Not too much, but enough to give you some extra tang or kick. My favorite booth at the local farmer's market is "The Goat Cheese Man." (That's not their real name, that's just what I call them)
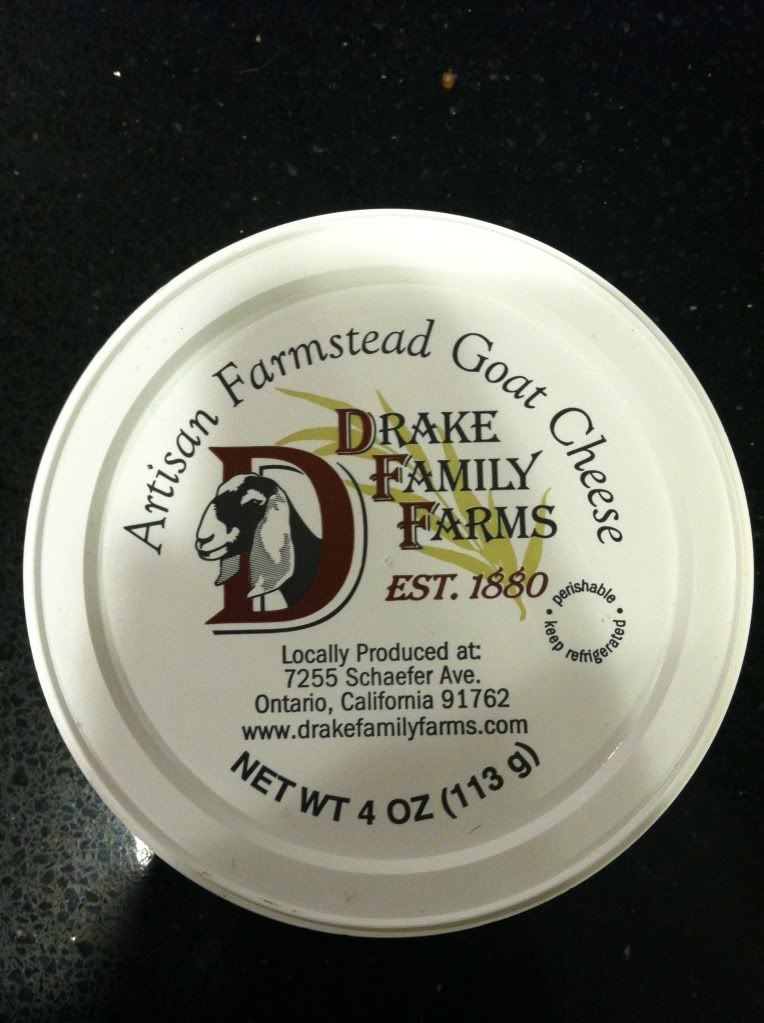 |
| They have many different flavors. The one we used (pictured here) is herb and garlic goat cheese. |
Make sure there's protein! You get a little bit from the cheese, yes, but the key to making a salad a real meal is having a protein component. This doesn't have to be meat - you could also use eggs, nuts, beans, or some grains (like quinoa).
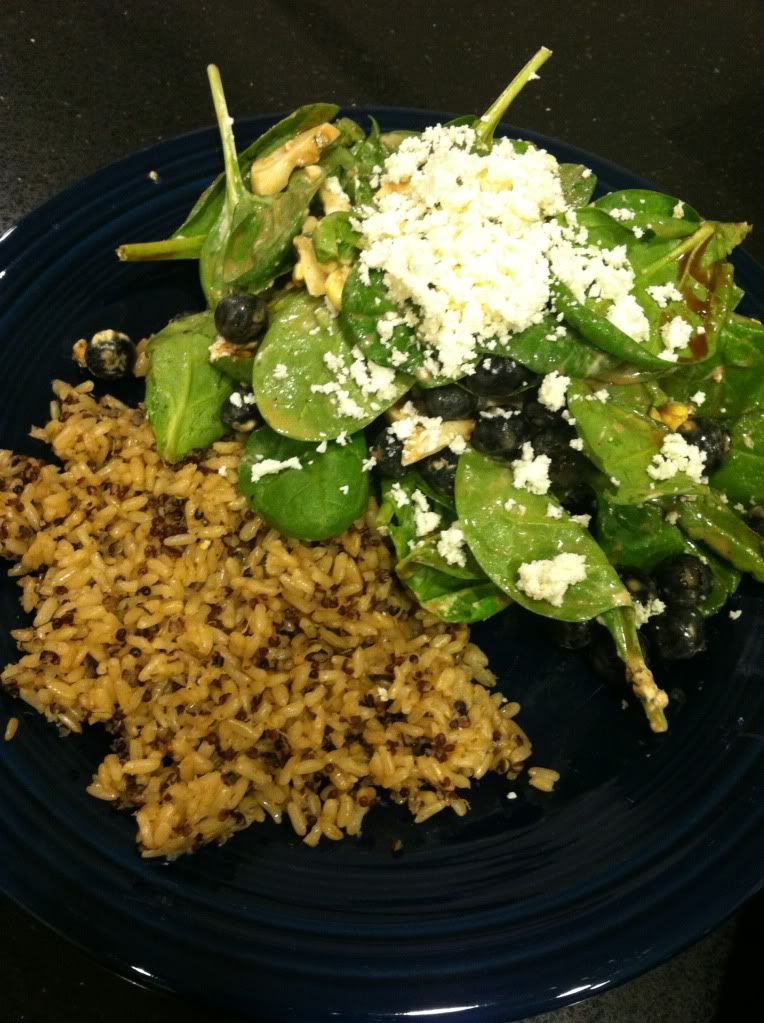
So, now that you know the basics of a good salad, let me share mine:
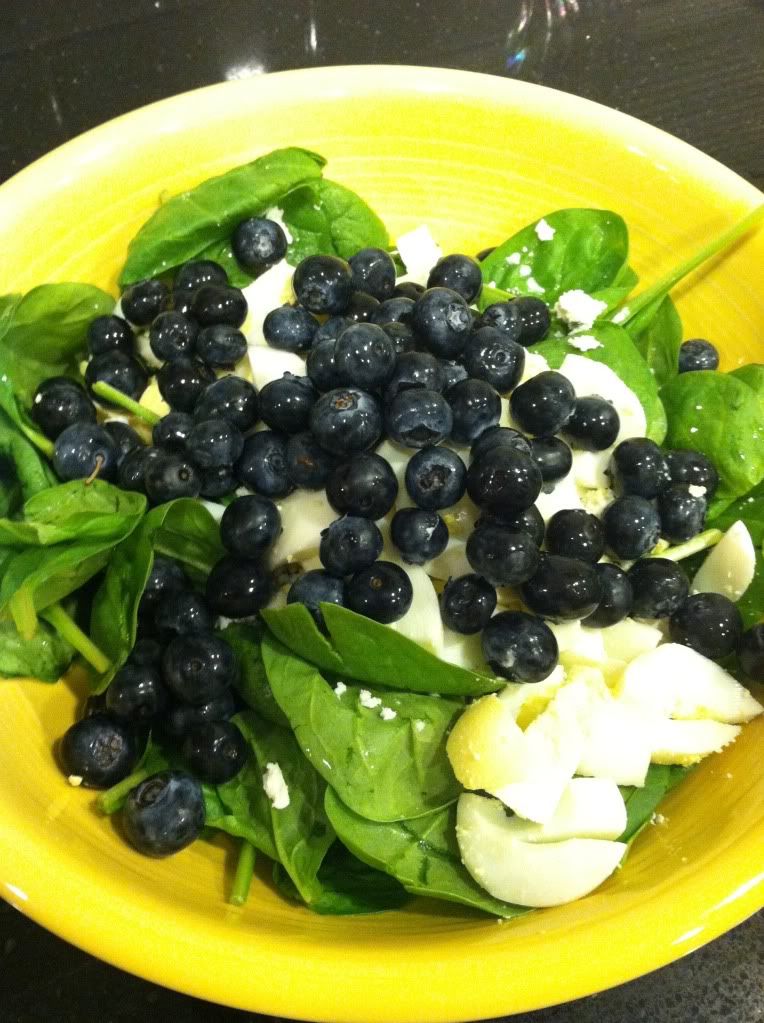
Ingredients:
- Fresh spinach
- Hard boiled eggs
- Herb and Garlic Chevre (goat cheese)
- Blueberries
- Ken's Balsamic with Honey Dressing
So, now that you've heard from us, we want to hear from you! What's your favorite summer salad? Do you have any salad making tips or tricks you swear by? Let us know in the comments!
Tuesday, July 17, 2012
Taste and Tattle Tuesday: BBQ Fun!
Hi Everyone! Sorry for the late post, but it's time for another Taste & Tattle Tuesday!
Okay, most of us love a good hamburger, but it's fun to change things up now and then. I recently had a BBQ with friends, and I was in charge of side dishes. Well, I wanted to do a play on a hamburger, so I made meatballs, flattened them into patties, and turned them into sliders. So, take your favorite meatball recipe (Mine is secret. Shhhh!), fry them up, melt some provolone (or mozzarella, Pecorino Romano, or whatever your fave Italian Cheese is at the moment), and put 'em in a bun!

Had I had more time, there's what else I would have done:
Naturally, I would have made a marinara sauce to accompany the sliders. You could spoon a little on yourself or set it out for your guest to use as a dip. I also would have used different bread. Hamburger buns are fine, but I would have bought some Italian baguettes, sliced them up, and toasted the slices. It would have made it much more Italian and, well, better :)

Enjoy!! Feel free to share your favorite meatball recipes in the comment section below!
Tuesday, July 3, 2012
Taste & Tattle Tuesdays: Happy 4th of July!
Hi, Everyone! It’s Lauren!
This week, our Taste and Tattle recipe has a patriotic theme.

It’s an
Italian dessert, but hey, it looks American.
We hope this recipe helps you cool off and show off this 4th
of July!
I love me some Giada De Laurentiis. She’s, like, legitimately Italian,
so I always check her recipes first.
Here is her panna cotta.
Ingredients
- 1 cup whole milk
- 1 tablespoon unflavored powdered gelatin
- 3 cups whipping cream
- 1/3 cup honey
- 1 tablespoon sugar
- Pinch salt
- 2 cups assorted fresh berries
Directions
Place the
milk in a small bowl. Sprinkle the gelatin over. Let stand for 3 to 5
minutes to soften the gelatin. Pour milk mixture into a heavy saucepan and stir over medium heat just until
the gelatin dissolves but the milk does not boil, about 5 minutes.
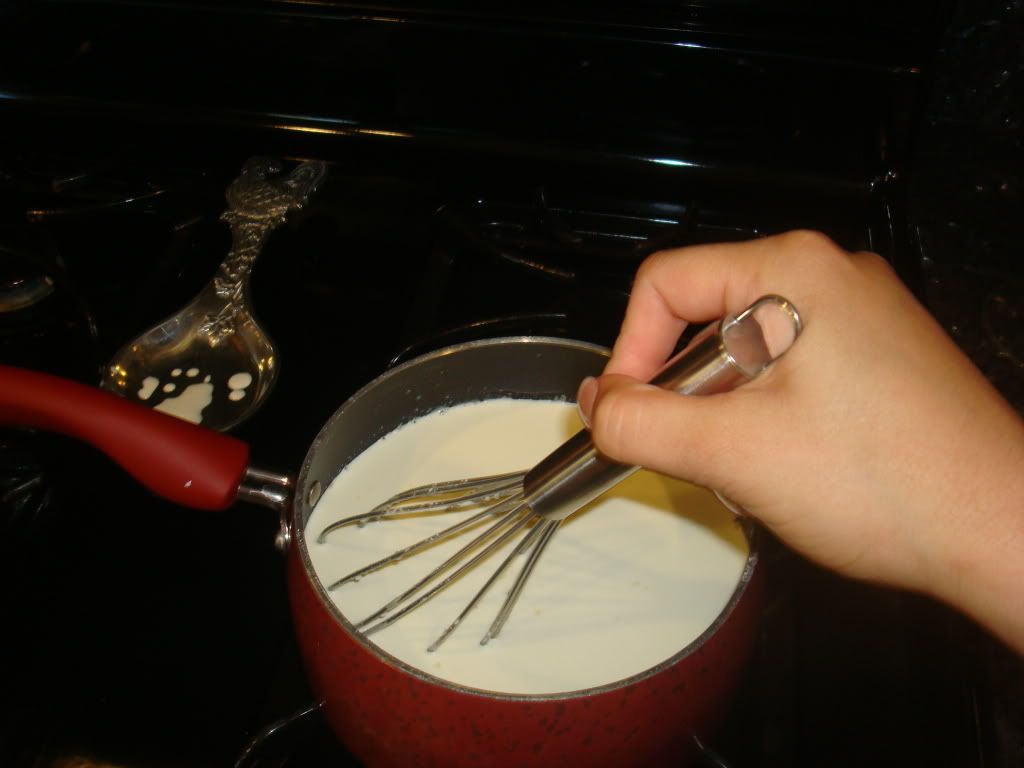
Add the
cream, honey, sugar, and salt. Stir until the sugar dissolves,
5 to 7 minutes. Remove from the heat. Pour into 6 wine glasses so that they are
1/2 full. Cool slightly. Refrigerate until set, at least 6 hours.
Spoon the
berries atop the panna cotta
and serve.
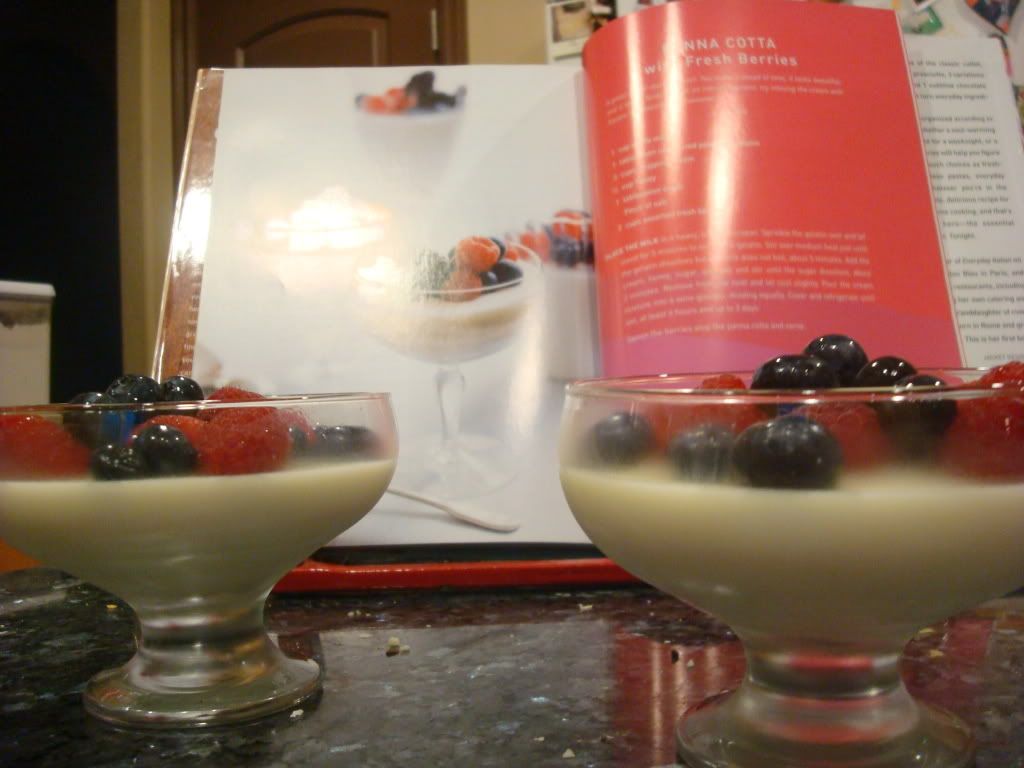
Lauren’s side note: Do not ignore that 6 hour part. The
first time I made this, I did. My guests had vanilla ice cream for dessert. I
ate panna cotta for breakfast. Not ideal…for my guests.
Now, it's your turn! Link up your favorite red-white-and-blue treats, or share ideas in the comments section below!
Tuesday, June 26, 2012
Taste & Tattle Tuesday ~ Our First Link-Up!
Hi Everyone! Colette here!
Today I'm bringing you our very first recipe post and our very first link-up!
One of our hopes for this blog is not only that we will have the chance to share our love of food with you, but that you in return will share the love back with us! That's how we came up with the theme for our link up:

This week we're "toasting" the beginning of our new blog with

Lauren and I agree that one of the best parts of summer cooking is all of the amazing fresh produce available. We decided that some of that fresh produce belonged in a cocktail glass as well. So, we concocted this to share with you all:
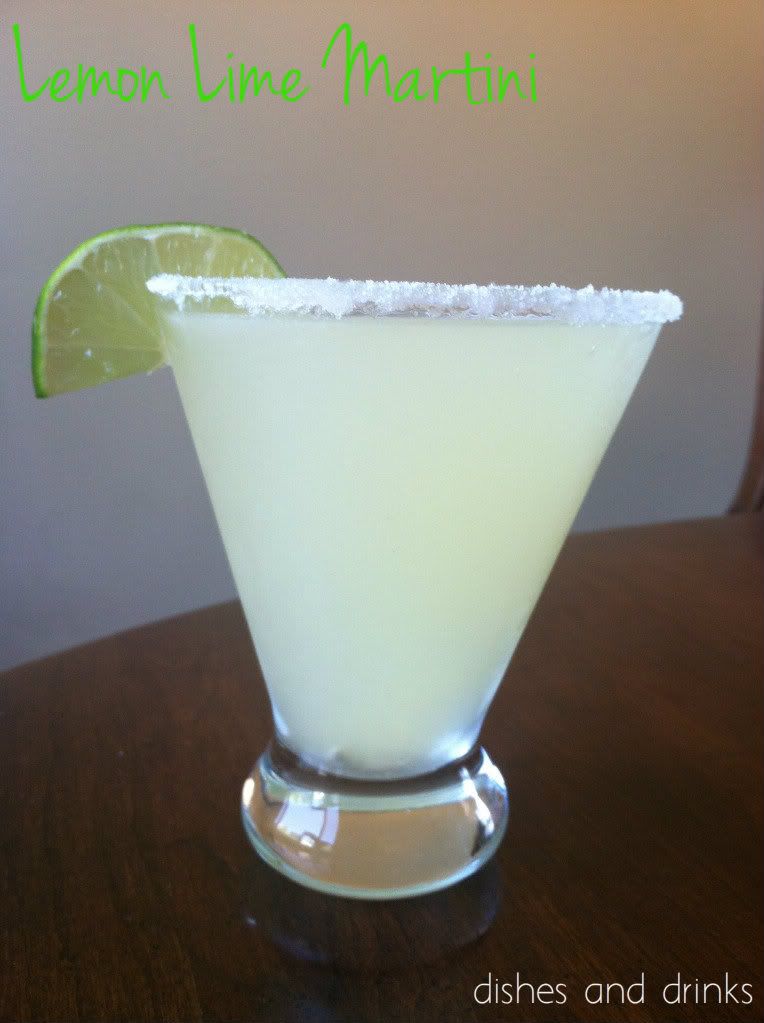
No, that is not a margarita you see in the picture! It is a lemon lime martini. Here's how to make your own:
Lemon Lime Martini
Recipe makes one large or two medium cocktails. Directions are for one large. Ingredients
2 Fresh Lemons
2 Fresh Limes
4 Tsp. Sugar
3 Shots (1.5 oz each) of Vodka
Flavored Sparkling Water/Club Soda (we chose lemon)
Ice
Tools
Cocktail shaker
Hand-held juicer (like this one!)
Shot glass
Garnishes
A tray of sugar to dip the rim
An extra slice of lemon or lime to garnish
Directions
(1) Slice the lemons and limes in half. Rub the edge of one around the rim of the glass (it's okay if a bit of citrus juice drips into the glass itself). Turn the glass upside down on the tray of sugar and coat the rim. Set the glass aside.
(2) Add ice to the cocktail shaker. Over the ice, use the hand-held juicer to extract all the juice from both lemons and both limes. Add the vodka and three of the teaspoons of sugar. Shake well.
(3) Pour the mix in the shaker into your sugar-rimmed cocktail glass. Top the drink with a floater of club soda or flavored sparkling water (fill the rest of the glass). Sprinkle in the remaining teaspoon of sugar. Garnish with a lime slice and head out to your patio to enjoy!
Note: We love super tart cocktails, which is why we chose to use a lemon-flavored sparkling water for our float. If you'd like to mellow the citrus flavor, choose a plain club soda. If you want to amp up the lemon even more, replace the vodka with citron vodka, or add a shot of triple sec.
Cin Cin!
And now, it's your turn...
What's your favorite cocktail to enjoy in the summer? Leave us a comment or link-up your blog below! And be sure to join us for our next Taste & Tattle Tuesday, where the theme will be Fourth of July Party Treats!
Subscribe to:
Posts (Atom)