Hey, Foodies! It’s Lauren this week. Today, I’m
tattling on a local restaurant. My husband and I recently visited Tango, a
semi-new restaurant in Escondido, CA. We heard some good things about this
place, and once we reviewed Tango’s menu, we found ourselves making a
reservation.
http://www.tangoongrand.com/
Here’s a quick overview of the place. Tango is part
restaurant and part lounge. The lounge side has a beautiful bar, amazing
cocktails, and a live pianist reminiscent of a downtown piano bar. The piano
even functions as a table, so there are seats at the piano. You’re encouraged
to sip your cocktails while you sing along with the pianist. While they were
getting our table ready, we tried some different martinis in the lounge. We
tried a pear martini and a pomegranate martini; you could taste the fresh
ingredients in both. I would go back just to try more martinis. Also, they had
a substantial bar menu, but we were there for dinner, so we didn’t get to taste
any of it.
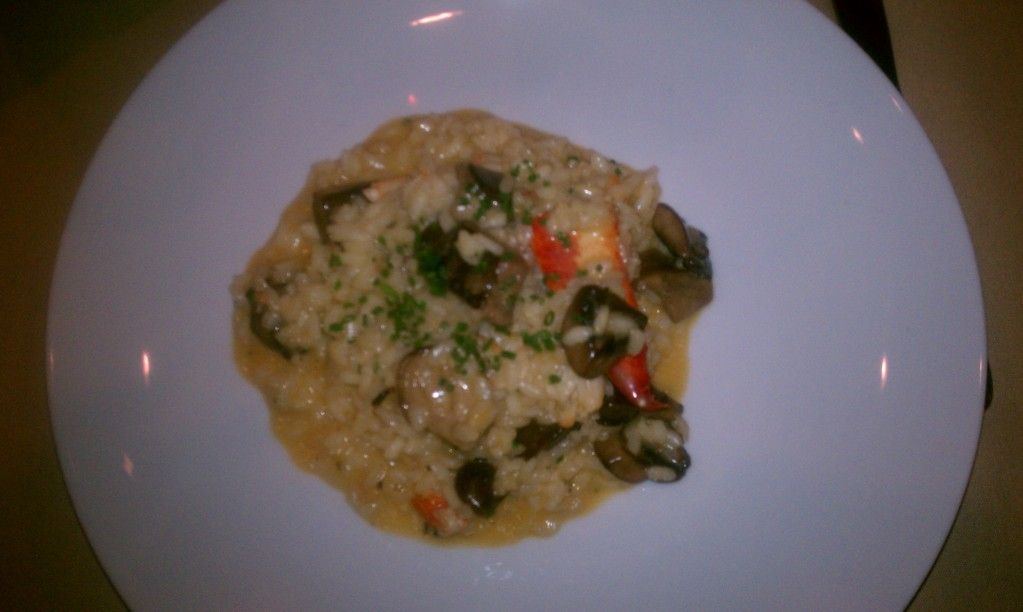
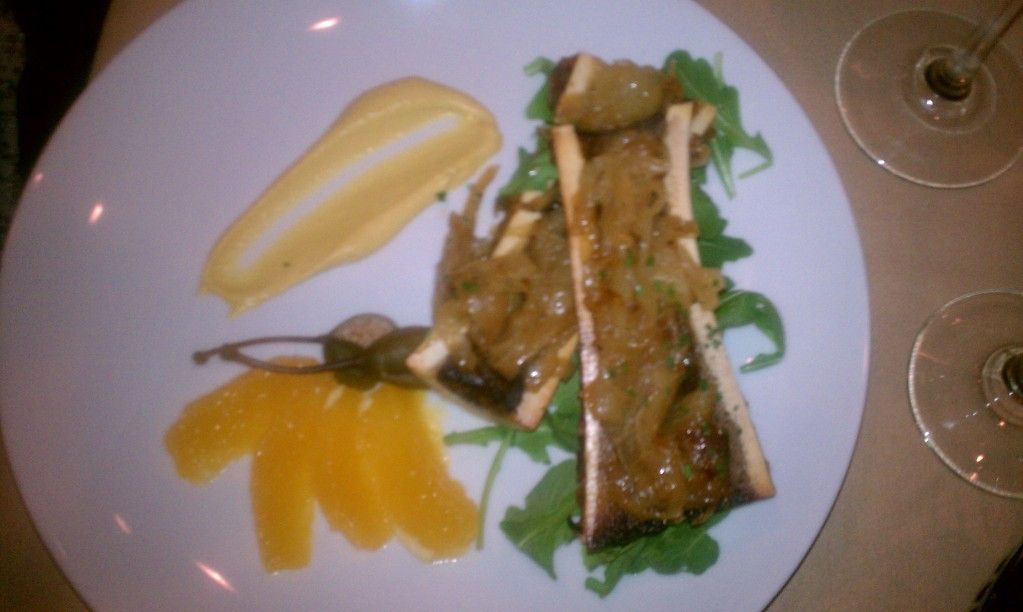
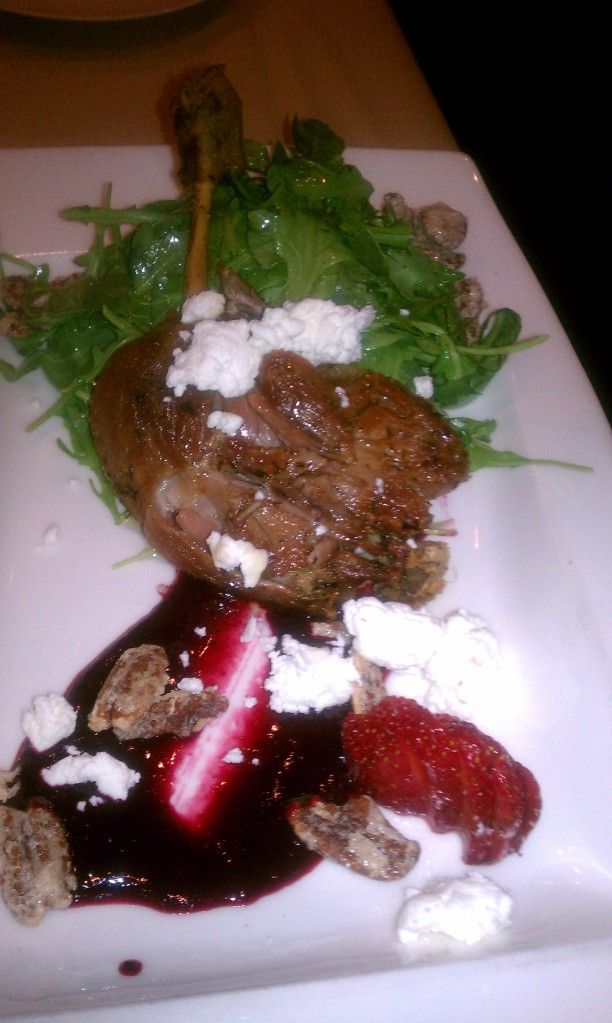
At dinner, we ordered three appetizers. We ordered: lobster
risotto, duck confit, and bone marrow.
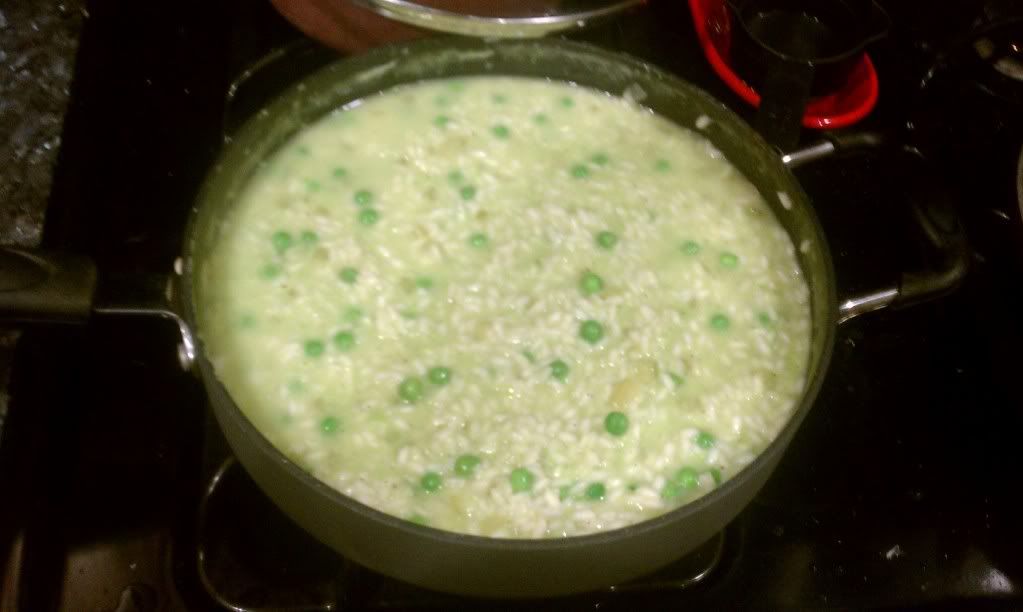
The lobster risotto (Main lobster, Arborio rice, truffle oil,
local oyster mushrooms, and chives) was cooked perfectly, but I could have done
with a tad less salt. It was the first time a restaurant hasn’t overcooked
lobster in a while, so I was happy.
This was my first experience with bone marrow. I
see chefs on television use it all of the time, so I was desperate to try it. I
wasn’t disappointed, but I suspect there’s better quality out there. I only say
this because there wasn’t much marrow in the bones. With that said, it was
delicious. The caramelized onions and Dijon mustard sauce rounded out the dish
nicely. There was a nice balance of savory and sweet, to me.
This was also my first experience with Duck
Confit (Duck confit, seasonal jam, toasted nuts, baby arugula, goat cheese, and
a vinaigrette). Confit is when a meat is poached or cooked in its own fat. I’m
sure I gained a few extra pounds on this dish alone, but it was well worth it.
The duck was tender, and it paired nicely with the goat cheese and jam, again
blending savory with sweet.
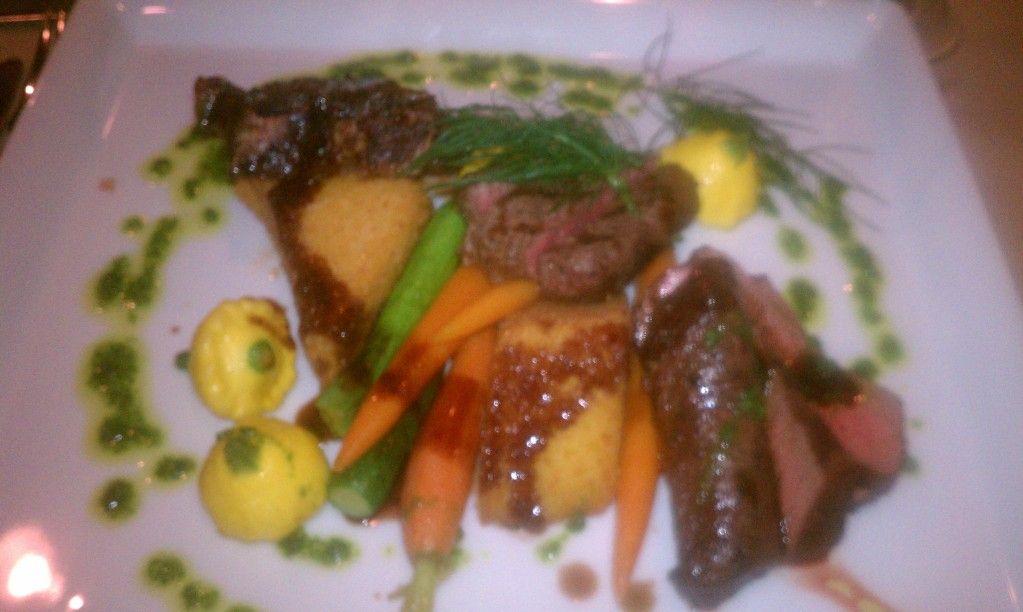
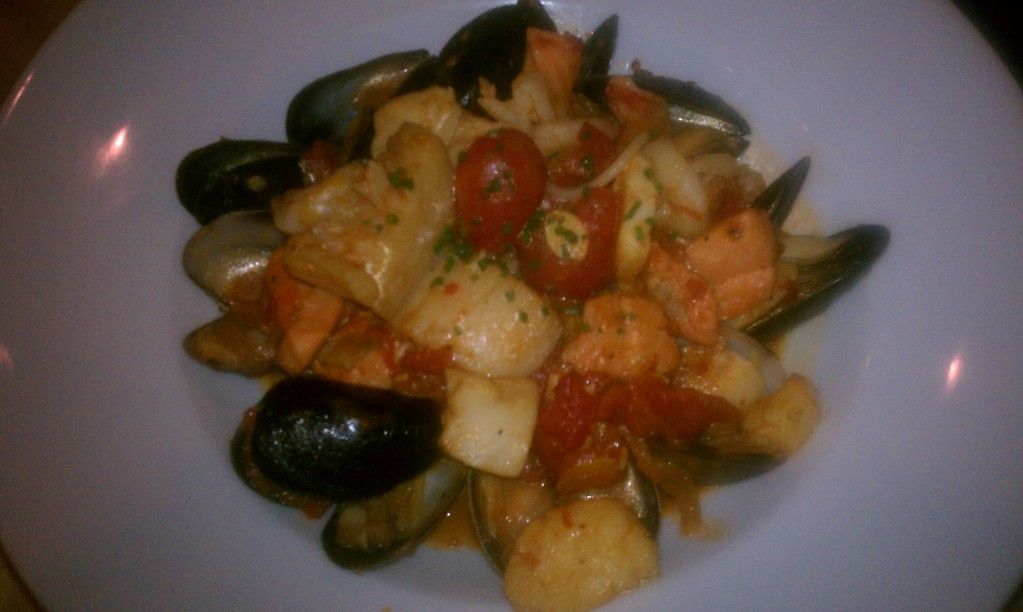
For our entrees, we ordered a grilled meat plate and pasta
with frutti di mare (fruit of the sea).
My meat plate had some skirt steak, lamb, and a small filet.
It came with some veggies and a fried piece of polenta (yum!). The flavors were
great and everything was seasoned well, but I suspect my dish was ready before
the rest of our table’s entrees because the meat was a little cold, which I
hate, and the veggies were a tiny bit undercooked.
My husband’s pasta dish was just as flavorful
but much warmer. It’s in a loose saffron tomato sauce reminiscent of a
cipollini. It had fish, mussels, shrimp, and scallops. I would go back just for
this dish! If you love pasta and sea food, this is your meal!
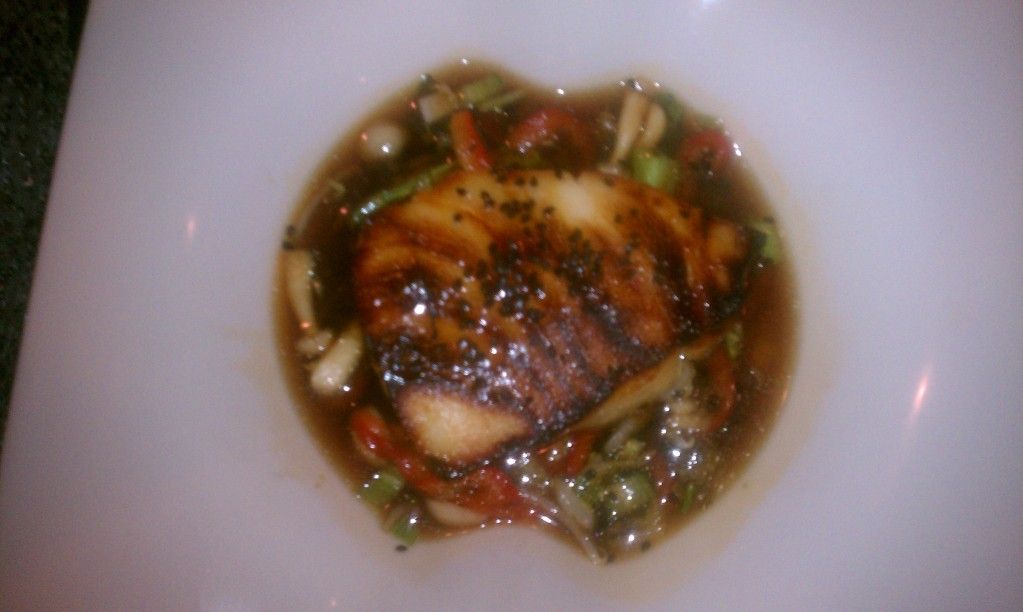
The couple we went out with had the sea bass in
a miso broth and the chicken, which is wrapped in bacon. They had good things
to say about both dishes.
Lastly, we had dessert. Often, I pass up dessert
because I’m simply too full; however, when crème brulee is an option, I always
make room. It was an amazing brulee served with some fresh fruit. Next time,
I’m cutting back on the appetizers and ordering two crème brulees.
Overall,
I would recommend this place, and I know we’ll be back. They’re reasonably
priced, and they have a variety of dishes and drinks If you visit Tango, please
let us know about your experience. We’d love to hear about what you tried and
how you like it!
Tuesday, September 25, 2012
Tuesday, September 18, 2012
Taste & Tattle Tuesday: Mason Jar Salads
Hi Everyone! Colette here!
I know it seems like all I write about is salads (see here), but I have good reason! Salads are easy, diverse, and a good way to make sure you're getting 5 full servings of fruit and veggies a day.
This week, I want to talk about something I saw on Pinterest: Mason Jar Salads.
Here's the picture that first sparked my interest:
I got my hands on three Mason Jars and decided to give my own spin on these a whirl this week. The salads will last in the jar up to 7 days, so I made all three of mine on Sunday. The nice thing about doing the prep ahead of time is that these are super easy to grab-and-go before work or school.
Here's what I started with to make my salads:
I decided to make three different types of salad to make sure I had some variety in my lunches for the week (variety is the spice of life, right?). I made an Asian-inspired, a Greek-inspired, and a Southwest-inspired.
Now, most of these were made with things I just happened to have on-hand. I'm already plotting what changes and additions I can make in the future to add more protein and new flavors. But here are this week's creations:
Southwest Salad in a Jar
1 oz. tortilla chips, crumbled
1/3 cup shredded jack and cheddar cheese
1/4 cup jalapeno + cilantro salsa
Carrots (julienne)
Yellow corn
Greens (50% baby spring mix, 50% baby kale)
Asian Salad in a Jar
2 tbsp. Tastefully Simply Tangy Ginger Dressing
2 tbsp. sunflower seeds
Mushrooms (sliced)
Carrots (julienne)
Greens (50% baby spring mix, 50% baby kale)
Greek Salad in a Jar
2 tbsp. Ken's Honey Balsamic Vinaigrette
1/3 cup fat-free feta cheese
5 Kalamata olives
Tomatoes (grape, whole)
Carrots (julienne)
Mushrooms (slived)
Greens (50% baby spring mix, 50% baby kale)
I layered the salads by putting the dressing on the bottom of the jar. I topped that with cheeses and/or nuts. Then came the heartier veggies. Finally, the greens went on top (so, when you dump the jar out onto a plate, it will be on the bottom). Here's how the jars look, ready to go:
Do you bring lunches to school or work? What are your easy grab-and-go lunch solutions? What would you like to put in a mason jar salad? Leave your suggestions in the comments below!
Tuesday, September 11, 2012
Taste and Tattle Tuesday: Pea Risotto with Scallops
Hi Everyone! Today Lauren is presenting her spin on Tyler Florence's Sweet Pea and Scallop Risotto.
For the full original recipe, click here!
1. The first step is to make the puree. Set it aside.
2. Next, I get the chicken stock or broth warming up. I also start cooking some bacon. This recipe doesn't call for bacon, but I think it adds a nice salty element. Note: if you want to make this vegetarian, use vegetable broth/stock and forget what I said about bacon.
3. Next, you'll need to prep your celery, shallots, and peas (if frozen, let thaw). I choose to add a bit more celery and shallots than the recipe calls for. I love shallots, and I like a little bit of crunch.
4. Saute the celery and shallots in a bit of olive oil. Then, add in the rice and make sure the rice gets coated in the olive oil. Tip: I do this with my Spanish rice, too! It just makes the rice better :)
5. Once step four is done, start adding a cup of stock at a time. Once the first cup is absorbed, add another. Repeat. You may or may not use all of the stock the recipe calls for.
6. Season with salt and pepper. It's important you add a bit, taste, and then, if necessary, adjust. At first, I'm pretty light with both because you can always add more.
7. Stir in the Parmesan and butter. Tip: use any Italian cheese you like. I prefer to use Pecorino Romano. I also add more cheese than the recipe calls for.
8. Lastly, fold in puree and whole peas. Take off heat, cover, and set aside.
If you want to add scallops, you have a few more steps. If not, you're done!
9. Make sure you pat the scallops with paper towels, and then season on both sides with salt and pepper.
10. Warm a pan that contains a bit of olive oil and butter. Remember, never put anything in a cold pan. Do not crowd the scallops and do not add too much oil. If you do the first thing, they won't cook well. If you do the second thing, they will boil/poach versus sear.
11. Do not touch your scallops until you're ready to flip them. I wait for them to look a little less translucent halfway through, and then I flip them. I suggest using a fish spatula, if you have one.
12. I let my scallops rest on a paper towel.
Then you're ready to plate your whole meal, and voila!
It's a fairly inexpensive meal that will blow people away. It's also easy to do, so don't be scared.
If you try this, please let us know. We'd love to hear about your experience with this recipe. Enjoy!
Tuesday, September 4, 2012
Taste and Tattle Tuesday: Food Truck Love
Hi all! Colette here!
When Lauren and I were first brainstorming for this blog, we knew we wanted it to be a lot about our kitchen adventures, but we also wanted it to be about our real-world foodie adventures as well. I know Lauren has some amazing stories to tell us about NYC in the coming weeks, but for today, I'd like to focus our attention a wee bit closer to home and talk about my favorite SoCal food truck!
I've been trying lots of food trucks lately. It can be hard, being a pescatarian (and married to a vegetarian), since many food trucks have meat-heavy menus. But then I discovered the amazing, the incredible, the incomparable Eat At Recess.
Eat At Recess makes great food using great ingredients! Don't worry meat lovers, they have free range chicken and grass-fed beef. But, as one of their three simple rules states, Our animal products are all natural and humanely raised. Awesome, right? They ALSO have vegetarian faux-turkey, which I get quite a bit.
In addition, they have crazy fresh veggies used on their sandwiches and salads, which brings us to playground rule #2: We use local and organic produce as much as possible. I never thought the freshest, most diverse salad options I would experience locally would come from a food truck, but Eat At Recess delivers!
And, another awesome bonus about this food truck? Everything is served in 100% compostable packaging. Again, how cool is that?!?!
The truck is all school-themed as well, which makes this former professor's heart sing. Items on the menu include "The Trackstar" and "The BFF BLT." My husband's favorite is the "Green Light" (which has a spicy "Red Light" counterpart) and the "AP tots." Oooooo, the tots. I'll get there. I've tried a number of things on the menu, and my two favorites are the "Red Rover" or the "Simon Says Southwest" (both with veggie-meat instead of chicken) and the "Remedial tots."
Mmmmm. The tots. Okay, this place is KNOWN for their amazing tater tots. And let me just get this out there: I don't really like tater tots. But these? I devour them every week. The AP tots that my husband get have feta cheese and truffle oil on them (soooooo good), where the ones I get have a special spicy recess sauce, cheddar cheese, and bacon salt (which is actually vegetarian). I also add chopped jalapenos to mine.
So, if you're out and about in San Diego and see this bright yellow school bus colored food truck, it's worth being late to wherever you were going to stop and try their amazing food.
And if you don't believe my words, maybe you'll believe this:
Have you tried an amazing local food truck? What do you think about the food truck craze? Tell us in the comments!
When Lauren and I were first brainstorming for this blog, we knew we wanted it to be a lot about our kitchen adventures, but we also wanted it to be about our real-world foodie adventures as well. I know Lauren has some amazing stories to tell us about NYC in the coming weeks, but for today, I'd like to focus our attention a wee bit closer to home and talk about my favorite SoCal food truck!
I've been trying lots of food trucks lately. It can be hard, being a pescatarian (and married to a vegetarian), since many food trucks have meat-heavy menus. But then I discovered the amazing, the incredible, the incomparable Eat At Recess.
Eat At Recess makes great food using great ingredients! Don't worry meat lovers, they have free range chicken and grass-fed beef. But, as one of their three simple rules states, Our animal products are all natural and humanely raised. Awesome, right? They ALSO have vegetarian faux-turkey, which I get quite a bit.
In addition, they have crazy fresh veggies used on their sandwiches and salads, which brings us to playground rule #2: We use local and organic produce as much as possible. I never thought the freshest, most diverse salad options I would experience locally would come from a food truck, but Eat At Recess delivers!
And, another awesome bonus about this food truck? Everything is served in 100% compostable packaging. Again, how cool is that?!?!
The truck is all school-themed as well, which makes this former professor's heart sing. Items on the menu include "The Trackstar" and "The BFF BLT." My husband's favorite is the "Green Light" (which has a spicy "Red Light" counterpart) and the "AP tots." Oooooo, the tots. I'll get there. I've tried a number of things on the menu, and my two favorites are the "Red Rover" or the "Simon Says Southwest" (both with veggie-meat instead of chicken) and the "Remedial tots."
Mmmmm. The tots. Okay, this place is KNOWN for their amazing tater tots. And let me just get this out there: I don't really like tater tots. But these? I devour them every week. The AP tots that my husband get have feta cheese and truffle oil on them (soooooo good), where the ones I get have a special spicy recess sauce, cheddar cheese, and bacon salt (which is actually vegetarian). I also add chopped jalapenos to mine.
So, if you're out and about in San Diego and see this bright yellow school bus colored food truck, it's worth being late to wherever you were going to stop and try their amazing food.
And if you don't believe my words, maybe you'll believe this:
![]() |
The "Exchange Student" and Remedial Tots + Jalapenos. |
Have you tried an amazing local food truck? What do you think about the food truck craze? Tell us in the comments!
Tuesday, August 28, 2012
Taste and Tattle Tuesdays: Restaurant-Style Salsa
Hi all! Colette here!
It's hard to believe September is just around the corner. With Labor Day coming up, here's a great side dish to bring to your end-of-summer pool parties and BBQs. I actually made and served this salsa at a party I hosted last weekend, and many people left asking me for the recipe. Well, here it is!
Colette's Restaurant-Style Salsa
What makes a salsa "restaurant-style" in my mind? For one thing, freshness. Ripe tomatoes and hand-squeezed lime juice are a party in your mouth, unlike canned/preserved salsas from a jar. (Don't get me wrong -- I'll eat pretty much any kind of salsa all the time. But fresh is best). Another thing is that it tends to be less chunky -- it's pureed, not chopped. That's how I make mine.
Ingredients
Four (4) large, ripe tomatoes
Three (3) small limes
One (1) whole jalapeno
One (1) jalapeno, seeds removed*
Two (2) tablespoons chopped white onion
1/4 cup chopped red onion
Two (2) tablespoons cilantro leaves (pre-chopped is fine)
Salt & Pepper, to taste
Tools
Knife
Cutting Board
Food Processor (small)
Directions
(1) Gather and prep all of your ingredients. You can choose to chop a whole onion yourself or be lazy like me and buy the pre-chopped kind from Henry's. *wink* Make sure as you chop one jalapeno, the seeds stay inside, and on the other, you remove all the seeds.
Why de-seed a jalapeno? Most of the spice in peppers comes from the seeds inside. While the flesh of jalapenos is also spicy, removing the seeds will take the heat down a notch. Now, I like my salsa flaming hot, so I'd normally use 2-3 whole jalapenos. But like I said, this was for a party, and I wanted to please a lot of palates.
(2) Add some of the ingredients to the food processor. I don't mean just pick and choose -- I mean add a little bit of each ingredient that you have. This will allow everything to blend better. Start with about 1/3 of each ingredient that you have chopped/prepped (tomatoes, jalapeno, onions, cilantro). Squeeze the juice from one lime over the ingredients:
(3) Pulse/chop for one minute. Repeat until all the ingredients are blended together:
That's it! Smooth and spicy, it's perfect for any party.
Enjoy!
It's hard to believe September is just around the corner. With Labor Day coming up, here's a great side dish to bring to your end-of-summer pool parties and BBQs. I actually made and served this salsa at a party I hosted last weekend, and many people left asking me for the recipe. Well, here it is!
Colette's Restaurant-Style Salsa
What makes a salsa "restaurant-style" in my mind? For one thing, freshness. Ripe tomatoes and hand-squeezed lime juice are a party in your mouth, unlike canned/preserved salsas from a jar. (Don't get me wrong -- I'll eat pretty much any kind of salsa all the time. But fresh is best). Another thing is that it tends to be less chunky -- it's pureed, not chopped. That's how I make mine.
Ingredients
![]() |
This is only some of what I used, thought what is pictured above is enough for an awesome salsa! |
Four (4) large, ripe tomatoes
Three (3) small limes
One (1) whole jalapeno
One (1) jalapeno, seeds removed*
Two (2) tablespoons chopped white onion
1/4 cup chopped red onion
Two (2) tablespoons cilantro leaves (pre-chopped is fine)
Salt & Pepper, to taste
Tools
Knife
Cutting Board
Food Processor (small)
Directions
(1) Gather and prep all of your ingredients. You can choose to chop a whole onion yourself or be lazy like me and buy the pre-chopped kind from Henry's. *wink* Make sure as you chop one jalapeno, the seeds stay inside, and on the other, you remove all the seeds.
Why de-seed a jalapeno? Most of the spice in peppers comes from the seeds inside. While the flesh of jalapenos is also spicy, removing the seeds will take the heat down a notch. Now, I like my salsa flaming hot, so I'd normally use 2-3 whole jalapenos. But like I said, this was for a party, and I wanted to please a lot of palates.
(2) Add some of the ingredients to the food processor. I don't mean just pick and choose -- I mean add a little bit of each ingredient that you have. This will allow everything to blend better. Start with about 1/3 of each ingredient that you have chopped/prepped (tomatoes, jalapeno, onions, cilantro). Squeeze the juice from one lime over the ingredients:
(3) Pulse/chop for one minute. Repeat until all the ingredients are blended together:
That's it! Smooth and spicy, it's perfect for any party.
Enjoy!
Tuesday, August 7, 2012
Taste and Tattle Tuesdays: Cold Entree
Good Morning, Foodies! Lauren here!
This week, we thought we'd feature a cold entree. I, however, don't do many cold meals (ahem! I blame the husband), so finding something that sounded yummy that is served cold posed a little challenge for me. I stumbled across a noodle dish, and since Asian food usually goes over well in our house, I gave it a shot.
Here's a link to the original recipe.
I did amend the recipe a bit. Whenever I follow recipes like this, I always find I don't have enough sauce, so I doubled the amount of everything, except the peanut butter.
Additionally, I added Sriracha (It's heaven if you like things spicy) and garlic. I knew I'd add sesame seeds and chow mein noodles at the end for garnish and flavor.
Tip: Never do anything just for garnish. Everything on the plate should be purposed to eat and add flavor. End of rant.
Mix the ingredients together and bring to a simmer.
Another tip: taste and adjust. I found it was still a bit too much like liquid peanut butter, so I added more of my favorite ingredients. People often tell me they can't cook or stray from a recipe, but that's just not true. You know what flavors you like, right? Then, start there. That being said, I added more garlic and siracha.
The recipe calls for pasta noodles, but I chose Pad Thai noodles (they were on sale and I love them).
Boil your noodles (always salt your water, but never put oil in the water or this Italian will judge you from afar). Normally, you don't rinse pasta, but it's okay to rinse Pad Thai noodles. Then, toss the noodles with the sauce; dish on a plate; and garnish with scallions, cucumbers (I julienned mine) and chow mein noodles.
Final thoughts:
1. If you want to make this recipe officially vegetarian, use vegetable stock/broth instead of chicken.
2. I added shrimp for protein, but you could do chicken or beef, too.
3. You can serve this cold, at room temp, or hot. Because you can serve it at any temp, it makes a nice party dish or something to take on a picnic.
Enjoy!
Subscribe to:
Posts (Atom)